
How to create custom post types in WordPress the right way
Posted 26th September, 2019 by Sarah
Custom post types in WordPress are a powerful feature of the platform that provide users with the all-important flexibility they need to create a completely customised website.
When they were first introduced, they helped WordPress make the leap from a simple blogging tool to a fully-fledged content management system. Today, custom post types continue to be a useful feature, particularly for developers who specialise in bespoke WordPress sites.
In this guide, we’ll explore what custom post types in WordPress are, how they work and when to use them. We’ll also show you how to create new post types with plugins and manually with code.
What is a custom post type in WordPress?
To understand what a custom post type is, first you need to know what a post type is on its own.
WordPress can store a lot of content, depending on what you add to your site. From blog posts and pages to images and menus, no two pieces of content are the same, and this is where ‘post types’ come into play.
Post types allow different types of content to be categorised. A single item is a ‘post’, which can be confusing because ‘post’ is also the name of regular articles on your blog.
You’re probably already familiar with the two most common post types: posts and pages. But what you might not know is that WordPress comes with seven default post types:
*Posts
*Pages
*Attachments
*Revisions
*Navigation menus
*Custom CSS
*Changesets
So what is a custom post type in WordPress?
A custom post type is a type of ‘post’ that you create yourself. You can customise new post types to suit your needs, depending on the type of content you want to store and display on your site.
Why and when to use custom post types in WordPress?
Now you know what custom post types are, it’s important to know when you might need to create one.
The simple answer is: whenever the content you want to create doesn’t fit into one of the default WordPress post types.
In other words, if your content isn’t a blog post and it isn’t a page, it’s something else — potentially a custom post type.
Here are some examples of how custom post types in WordPress can be used:
*Products for an ecommerce site
*Events for an events or bookings site
*Recipes for a cooking site
*Courses for an online learning site
*Portfolio items for a personal portfolio site
*Case studies or testimonials for a design agency site
*Films for a movie review site
*Trails for a hiking site
*Albums for a band or musician site
The possibilities for creating custom post types in WordPress are endless.
It’s worth pointing out that sometimes, using regular blog posts for your content and assigning them specific categories might be all you need, saving you having to create a custom post type.
For example, say you wanted to publish book reviews on your site. You could create a ‘Reviews’ category for blog posts that you want to categorise as reviews. But if you wanted to further categorise your reviews by genre, such as romance, thriller, classic and so on, then it might make sense to create a custom post type.
Some plugins create custom post types.
If you’ve ever used WooCommerce to set up an online store or The Events Calendar to share events, you’ve used custom post types in WordPress.
Both of these plugins add their own custom post types to WordPress. WooCommerce creates ‘Products’ and The Events Calendar creates ‘Events’.
Similarly, LearnDash, a learning management system plugin, creates ‘Courses’, and MemberPress, a membership plugin, creates ‘Memberships’.
Creating custom taxonomies and custom fields
When working with custom post types in WordPress, there are two other content types you can use to group and/or add additional information to them: custom taxonomies and custom fields.
So what is a custom taxonomy?
Taxonomies in WordPress are basically just a way to group related posts.
By default, blog posts have two taxonomy types: categories and tags. These familiar taxonomies provide a handy way of ensuring related content on your site is easy for visitors to find.
When you create custom post types in WordPress, you can assign existing taxonomies, such as categories and tags. Alternatively, you might choose to create new taxonomies.
For example, if you were creating a custom post type for a recipe site, you might create custom taxonomies for ‘Breakfast’, ‘Lunch’, and ‘Dinner’.
And what is a custom field?
Custom fields, also known as post metadata, is another content type for when you want to add additional information to a custom post type.
For example, if you were creating a website for film reviews, you might use custom fields for information such as a film’s rating, the name of the director, and the release date.
Custom fields differ from custom taxonomies in that you wouldn’t use them to output an archive page. For example, you would have archive pages to display various film genres, but you wouldn’t have archive pages for film release dates.
How to create custom post types in WordPress
Custom post types are simple to register and add to any WordPress site. There are two ways you can do it:
*With a plugin, or
*Manually with code
Plugins provide the easiest way to create them because you don’t have to touch code. There are several plugins worth checking out...
*Pods – Custom Content Types and Fields
*Custom Post Types and Custom Fields creator – WCK
Each of these plugins is free to download from the WordPress plugin repository and all are highly rated.
For the next section in this guide, we’re going to show you how to use the Custom Post Type UI plugin since it’s by far the most popular option with 700,000 plus active installations. Then we’ll walk you through how to code your own plugin for creating a custom post type.
How to use the Custom Post Type UI plugin
Custom Post Type UI provides an easy to use interface for registering and managing custom post types and taxonomies for your site.
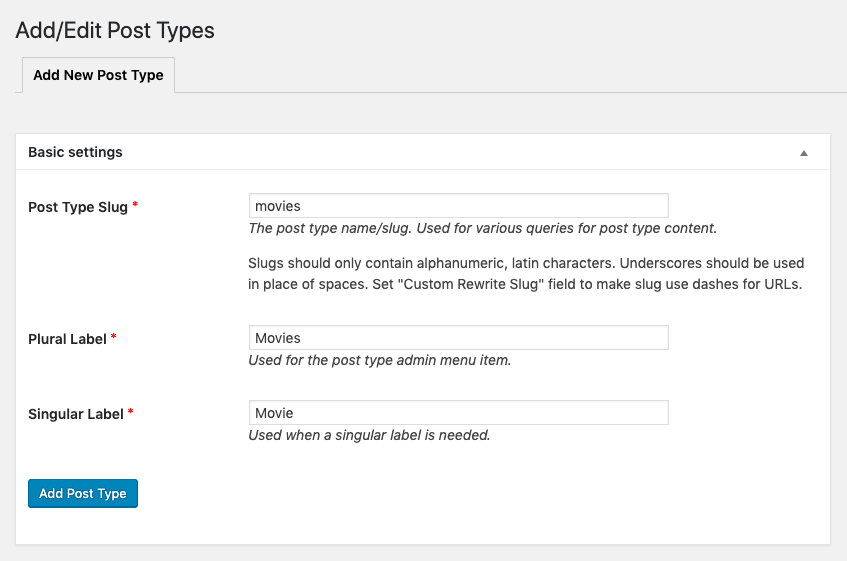
After installing and activating the plugin, go to CPT UI > Add/Edit Post Types to register a new custom post type. Under ‘Basic settings’ you can start entering details for your custom post type. For example, for a movie site you might enter the following:
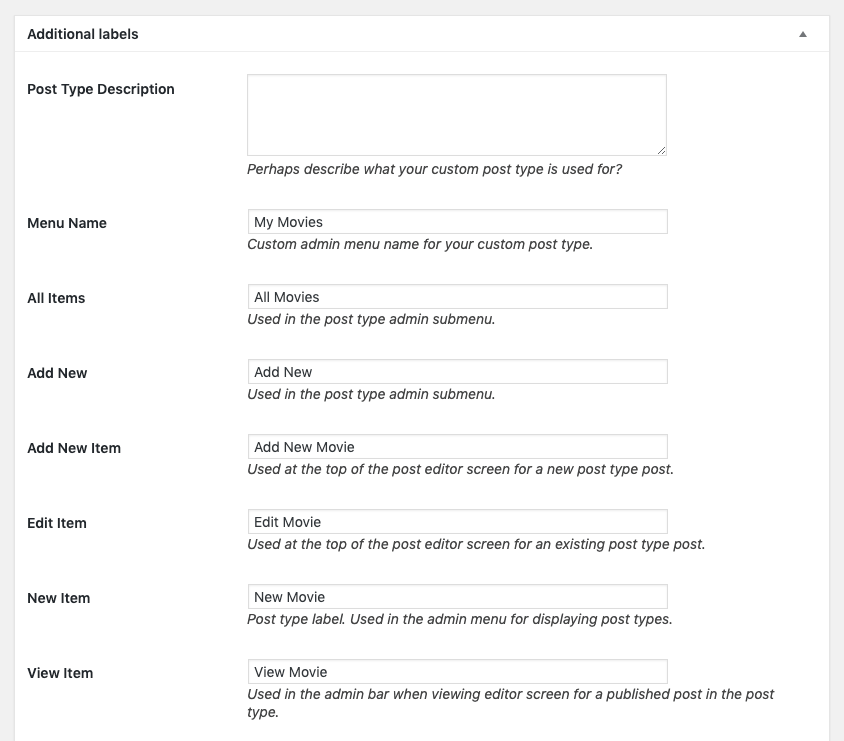
Scrolling down the page, under ‘Additional labels’ you can customize the various labels that are displayed in the WordPress admin for your custom post type.
You can then edit settings for your custom post type or leave them set to the defaults.
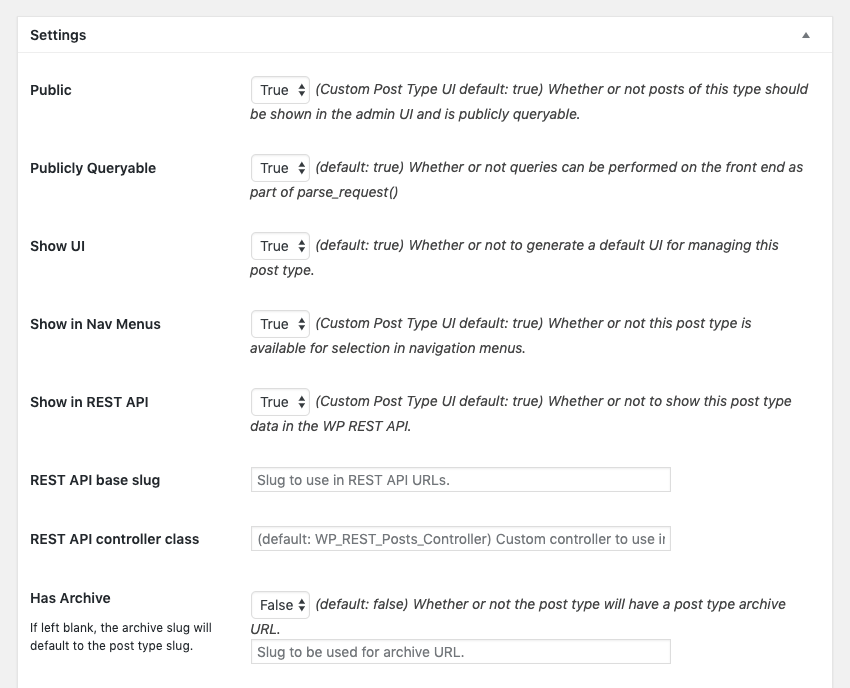
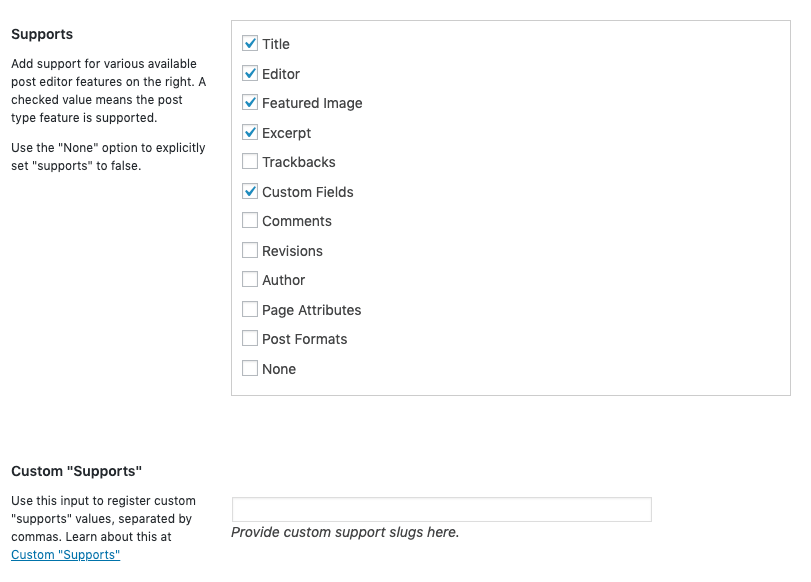
If you would like to add support for features in the post editor, you can enable them in the ‘Supports’ section. It’s recommendable to enable Title, Editor, Featured Image, Excerpt, and Custom Fields at the very least. You can also choose to create custom supports.
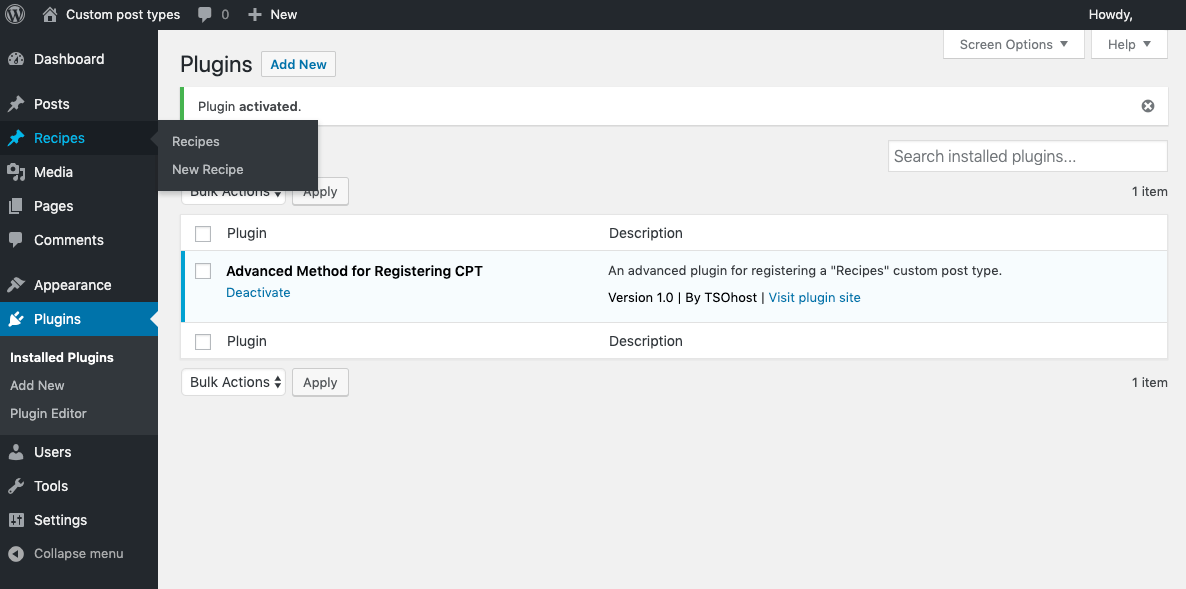
Once you’re satisfied you’ve filled in and checked everything you need, click ‘Add Post Type’ and WordPress will register your new custom post type. A menu item for your custom post type will appear in the admin menu.
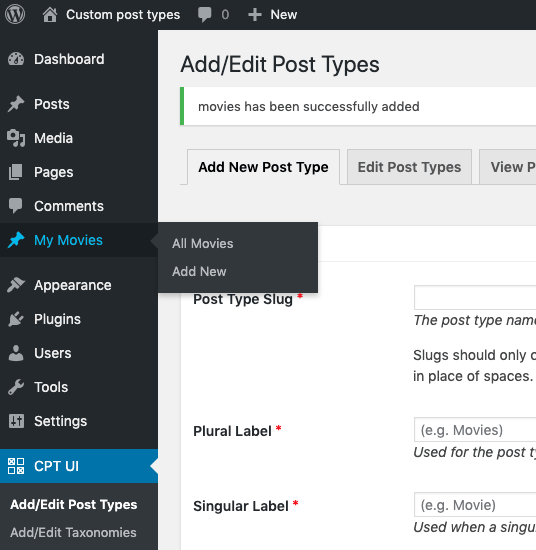
As you can see above, we’ve created a new custom post type for ‘Movies’. To create new content using the custom post type, go to My Movies > Add New.
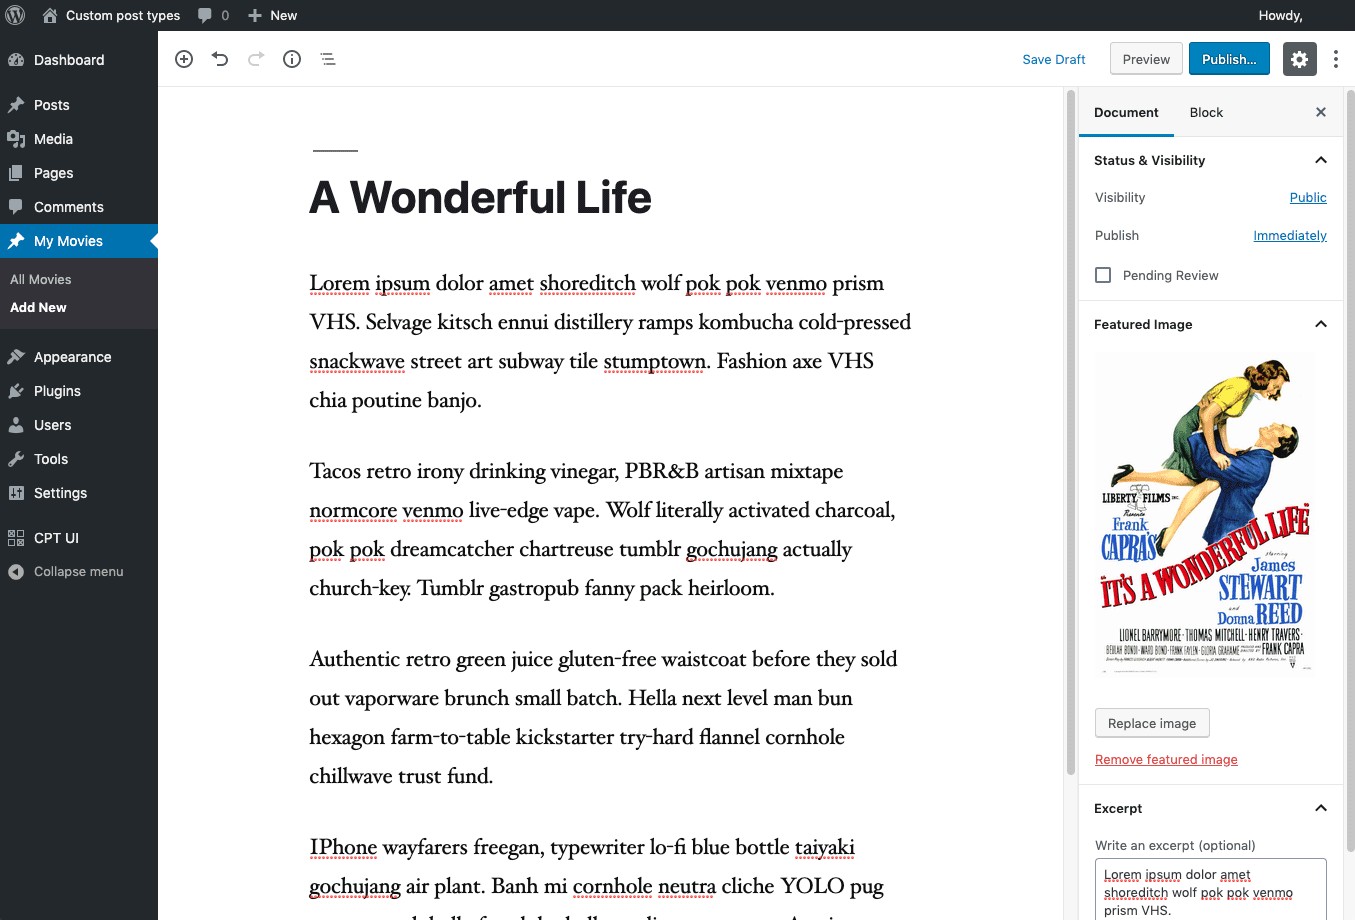
You’ll see the post editor as you would for any other post type in WordPress. Just enter your content and hit ‘Publish’ when you’re done.
It’s worth noting that the Custom Post Type UI plugin will register custom post types and custom taxonomies for you, but it doesn’t handle how these are displayed on your site.
When you publish your custom post type, it will display your content using your single.php file. All posts on your WordPress site are formatted using this template file. You can choose to create a custom template for your custom post type, which we’ll touch on briefly later in this guide.
How to manually code your own custom post type
If you’re more comfortable working with code, there are two ways you can register custom post types in WordPress manually: the simple way and the advanced way.
Registering a custom post type the simple way
If you just want to create a custom post type for your WordPress theme without the bells and whistles, simply add the following to your functions.php file:
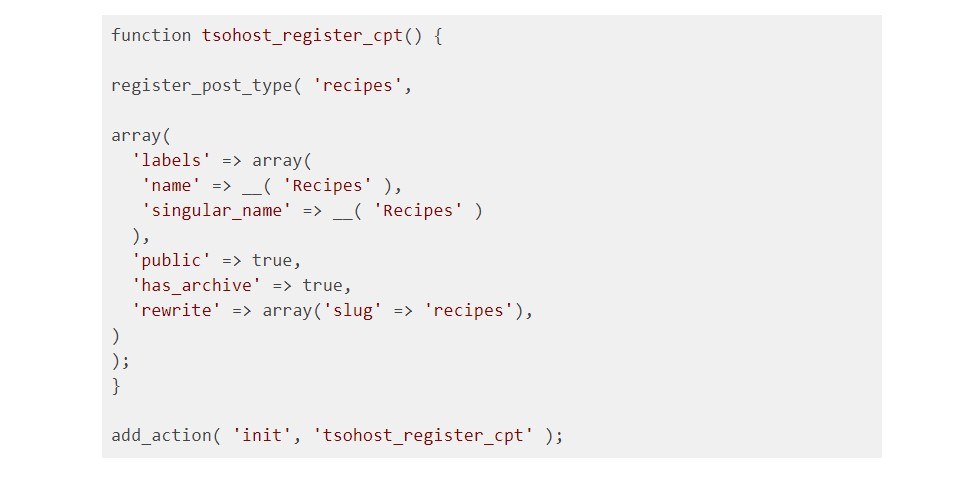
This bare-bones code will register a basic custom post type called ‘Recipes’. It defines a set of arguments for the custom post type, including setting the admin labels, enabling visibility, enabling archives, and creating a slug.
Registering a custom post type the advanced way
If you would like more control over your custom post type in WordPress, and maybe want to add more arguments for greater flexibility, the code below provides more options.
Above, we suggested adding code to your functions.php file. However, WordPress best practice dictates that it’s preferable to create a child theme or a plugin.
Adding code directly to your functions.php file means it will be lost if you update or change your theme. Using a child theme or plugin ensures your code won’t suddenly disappear with an update.
Here are the steps for creating a plugin.
Step 1: creating your custom post type plugin
Open your favourite code editor and add the following commented out text:
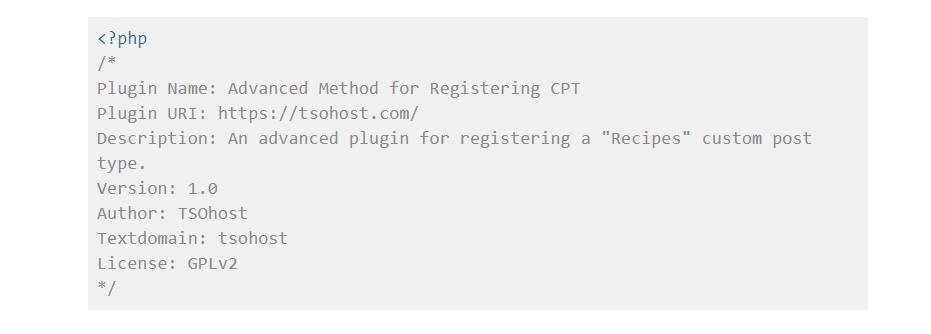
This information tells WordPress what your plugin is called and what it does. It also sets out the version, textdomain (for translation) and the license it’s created under.
These lines of code provide the foundation for any plugin. So once you hit save, zip the file, and upload it as a plugin to your site, it will install successfully. It just won’t do anything yet because there’s more code to add.
Step 2: creating the function for your post type
Next, we need to create a function to register the post type. Below the first lot of text in your plugin, add this code:

This is our basic function and we’ll add the rest of the code for the plugin inside the curly brackets.
Step 3: defining labels for your custom post type
The next step involves defining lables. These are the labels you’ll see in the WordPress admin area when working with your custom post type.
For this example, we’re creating a custom post type for recipes for an imaginary cooking site. Here’s the code that set out our lables:
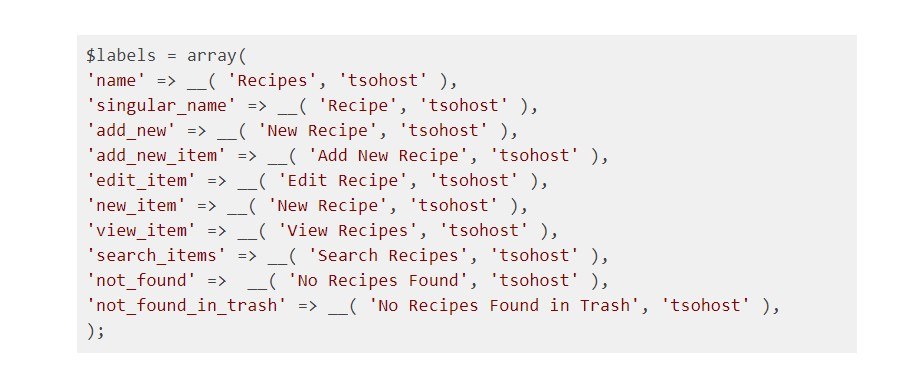
You’ll see that we’ve included variations of the word ‘recipe’ to fit the context of the lable, e.g. ‘Add New Recipe’. For your own plugin, you’ll need to replace the lables with your own.
We’ve written this code with internationalisation in mind so the labels will be translated for users. You’ll need to replace "tsohost" with your own textdomain.
Step 4: defining arguments for your custom post type
Next, you need to define arguments for your custom post type. Below the labels, paste the following code:

What does all that mean? Let’s go through how each line works:
*The “lables" argument sets out the labels we previously defined.
*The "descriptions" argument provides a description.
*The "supports" array defines the features you want available to you when creating a new post. In this case, we’ve specified a title for the post, the text editor – where you’ll enter your content – a featured image, excerpt and custom fields.
*'has_archive' => true enables archive pages.
*'public' => true ensures the post type will be displayed in search results and in custom queries.
*'hierarchical' => false When you set hierarchical to "true", the custom post type will support parent and child elements. In other words, the post type will behave like pages. When set to false, it’ll behave without a hierarchy like posts.
*The "rewrite" argument sets a slug for the post type, in this case, "recipes". 'show_in_rest' => true ensures the post type works with the Gutenberg interface and the WP REST API.
*'show_in_admin_bar' => true and 'menu_position' => 5 ensure the post type is displayed in the WordPress menu and can be found just below "Posts".
There are lots more arguments you can define for your custom post type, We’ve only defined some of the most important ones. Other arguments you might want to include are:
*show_ui – generate and allow a UI for managing your post type in the admin.
*capability_type – the string to use to build the read, edit, and delete capabilities. For example, in this case, we could use "recipes." The default is "post".
*show_in_menu – where to show the post type in the admin menu. When set to true, it’s shown in its own top level menu.
*can_export – whether to allow this post type to be exported. The default is true.
For the full list, check out the register post type entry in the WordPress Code Reference.
Step 5: registering your custom post type
With the lables in place and the arguments defined, the last step is to register your custom post type. Below the arguments, paste the following function:

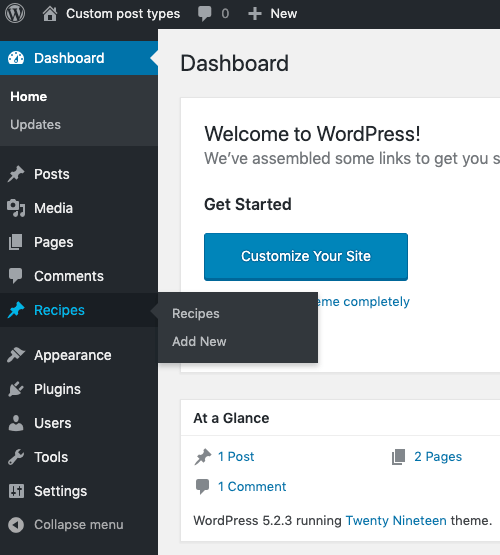
Now, save your file, zip it, and upload it to your site. Once activated, you’ll find your new custom post type in the WordPress backend.
You can go ahead and start adding new recipes to your site. Don’t forget to add featured images and excerpts.
How to display your custom post types in WordPress
There are two main ways you can view posts for your custom post type: as single posts and as post archives.
If you’ve created custom taxonomies for your custom post type in WordPress, you can also display custom taxonomy archive pages. For now, we’ll focus on single posts and post archives.
Displaying single posts
The single posts that you create using your custom post type will default to using the template set out in your theme’s single.php file. This template is also used for your blog posts, so your post types will look the same.
For example, here’s what single posts for our recipes custom post type look like in Twenty Nineteen...
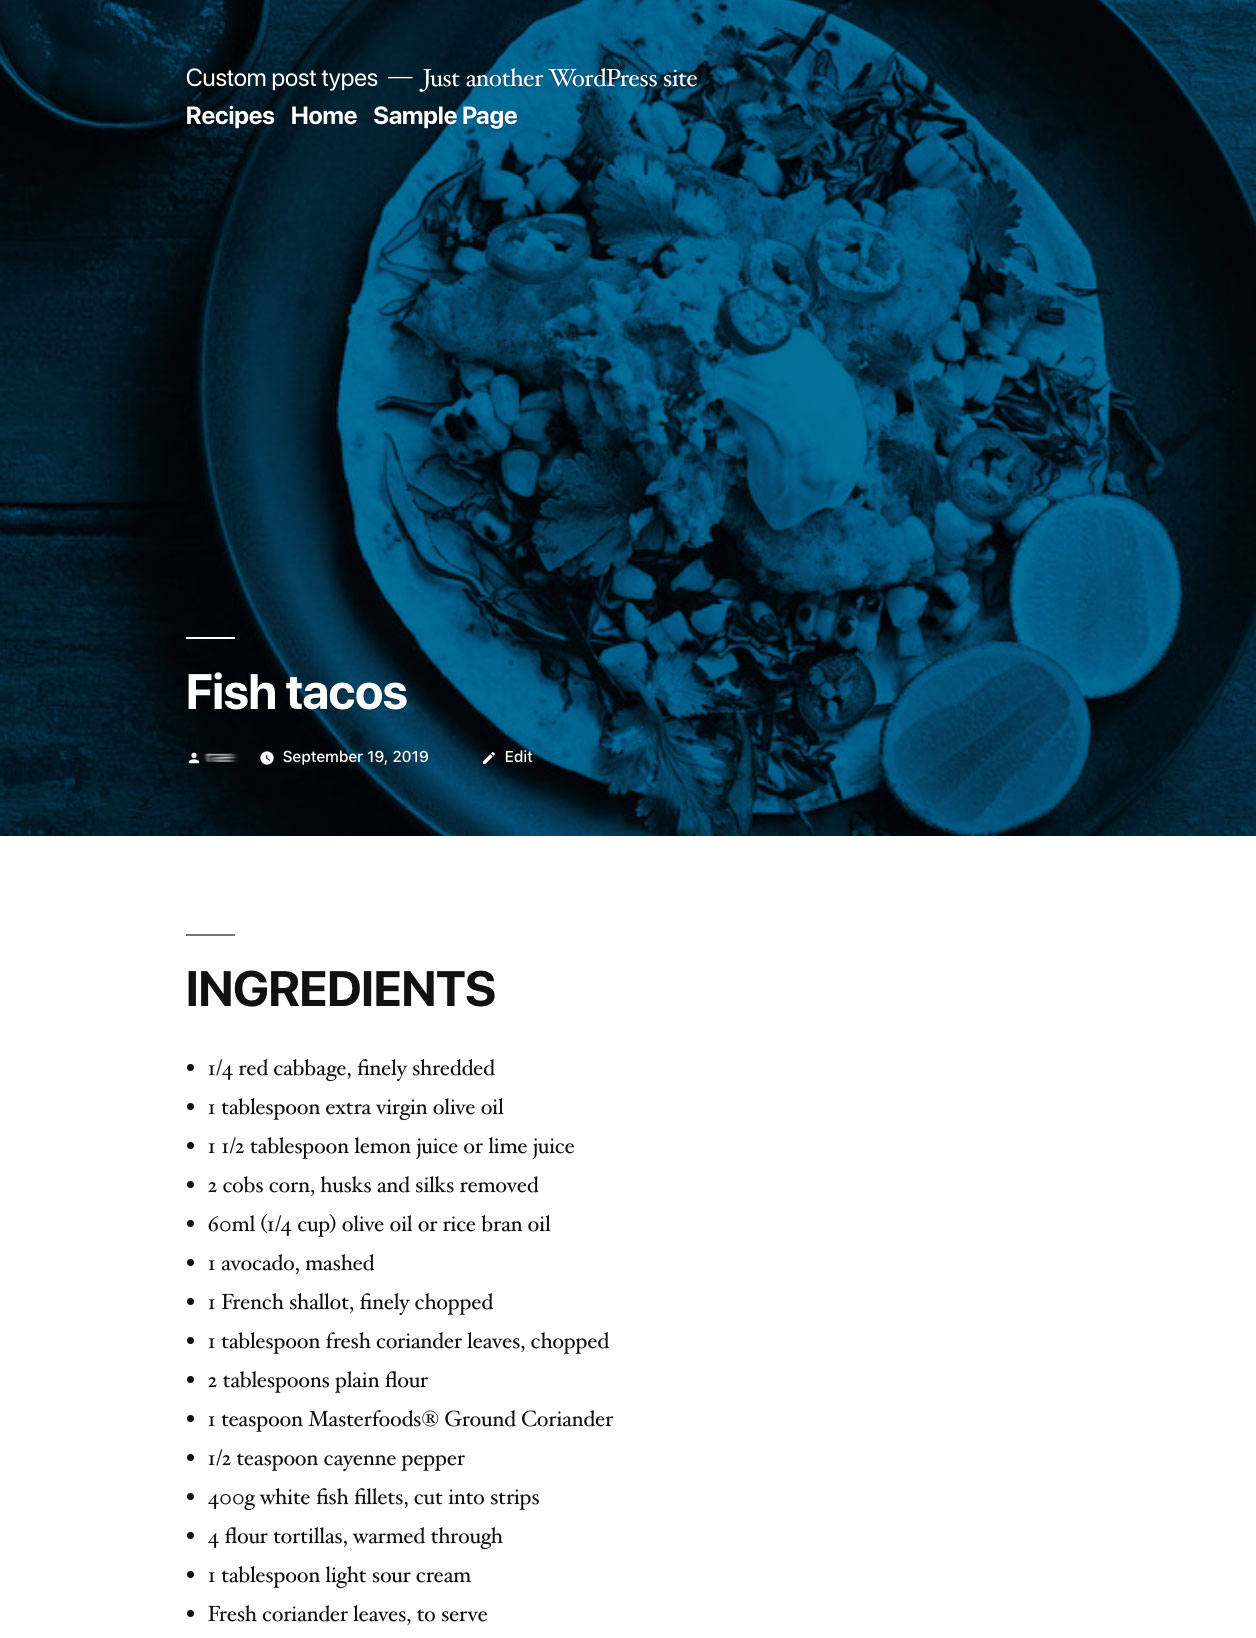
If you want to create a template for your custom post type, the easiest way to do it is to make a copy of your single.php file and rename it single_$posttype.php (replacing $posttype with the name of your custom post type). Then you can make changes to this copy to suit the layout you want for your single posts.
Displaying post archive pages
If you’ve defined 'has_archive' => true and created a slug using the rewrite argument, you can add the slug to your URL to view your archive. Go to example.com/slug to view the permalink for your archive page, where "example" is your domain name and "slug" is the slug for your custom post type.
If your theme has an archive.php file, WordPress will default to using that file as the template for your custom post type’s archive pages.
Here’s what our post archive looks like on the front-end of our test site:
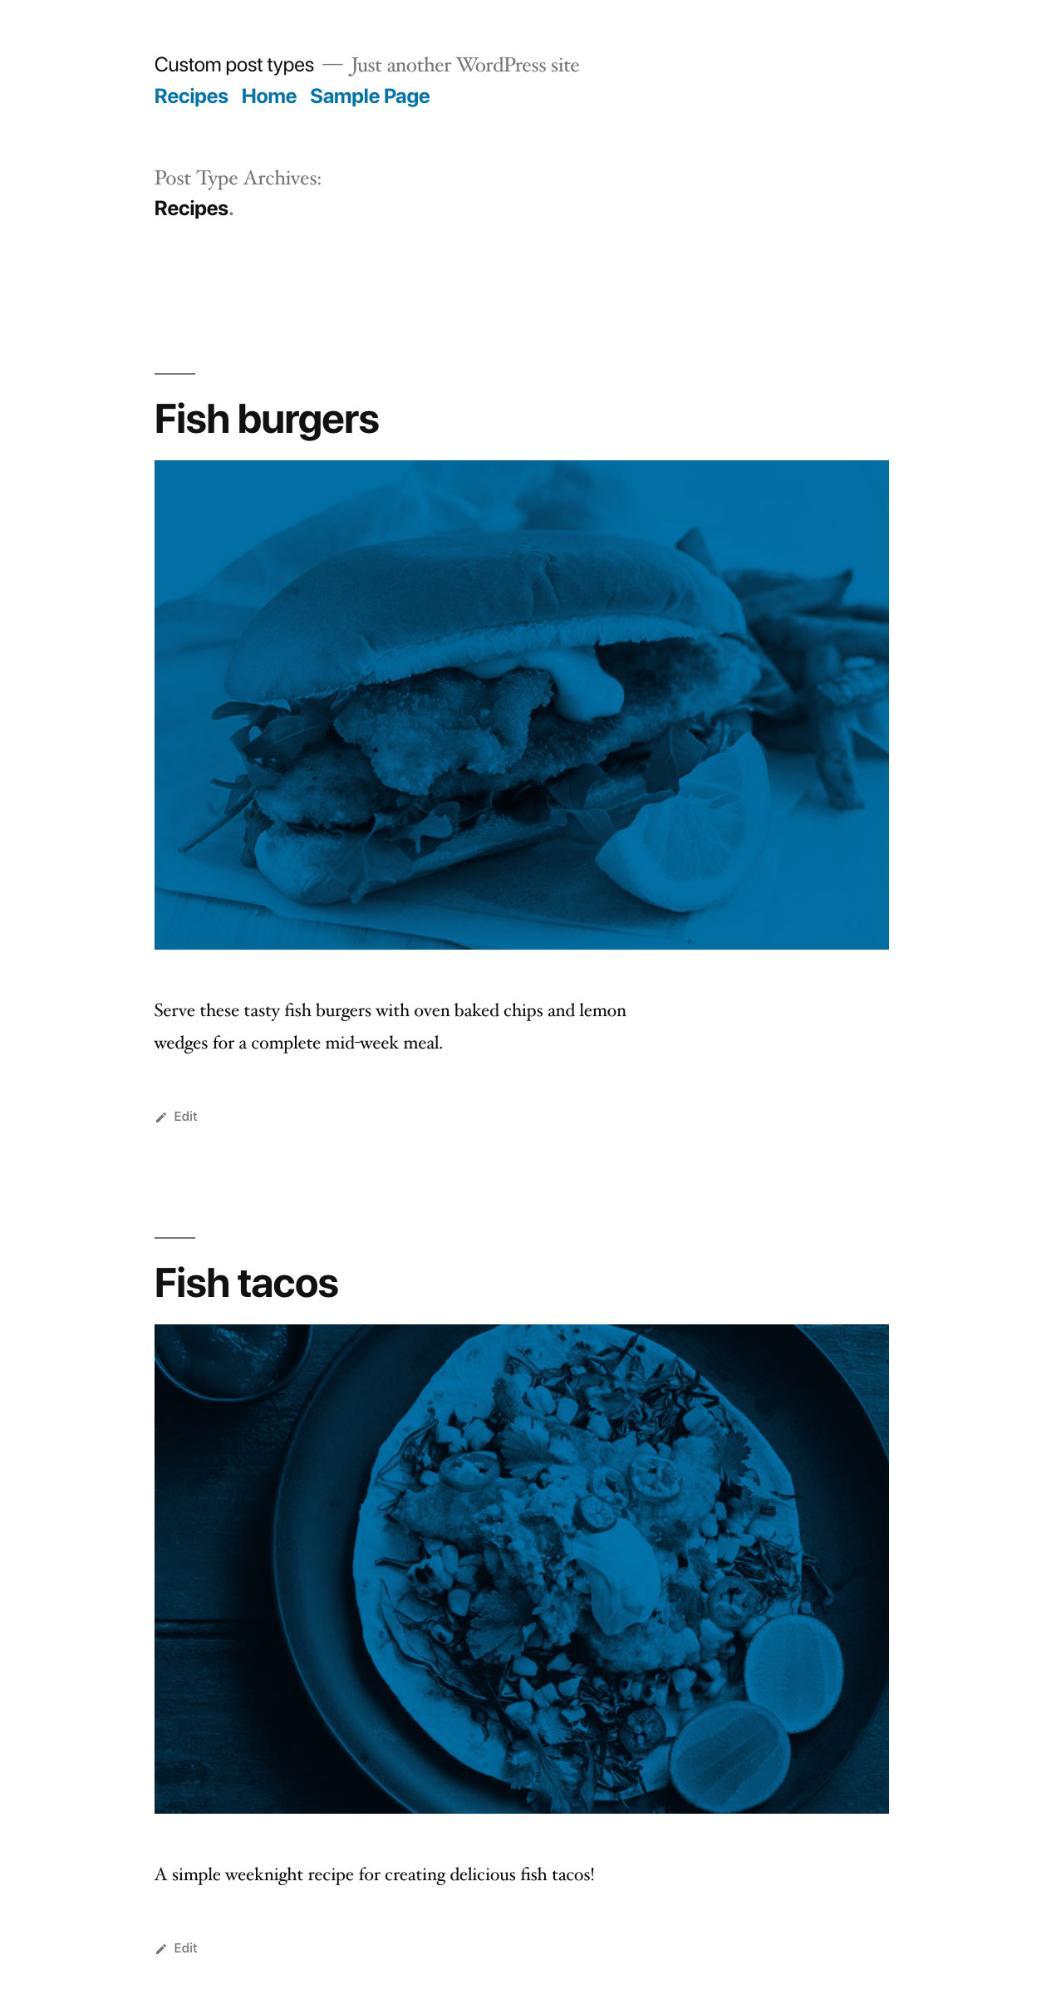
If you want to create a custom template for your archive page, it’s a similar process to creating a single post template. Make a copy of your archive.php page and rename it archive-$posttype.php, replacing $posttype with the name of your new post type. Then you can edit the template file to suit how you want your archived post types to display.
In summary
Custom post types in WordPress are a useful feature that provides the flexibility needed to create completely custom websites. They’re just as useful today as they were when first introduced to WordPress 10 years ago.
As we’ve explored in this guide, you can add custom post types to your WordPress site with a plugin or manually with code. There are some fantastic plugins available that provide intuitive interfaces for creating custom post types. Alternatively, coding your own will give you the control you need to create exactly the custom post type you want.
Need hosting for your WordPress site?
tsoHost specialises in providing WordPress hosting.
We have specifically tailored three types of hosting packages to ensure Word Press websites run at their slickest.
To find out more about our offering, visit our WordPress hosting pages.
Categories: WordPress